ShopDreamUp AI ArtDreamUp
Deviation Actions


Suggested Deviants


Suggested Collections


You Might Like…


Featured in Groups


Description
I have been meaning to write up an ear tutorial for a while now...not sure why though. I guess i just find ear anatomy fascinating, although a bit strange when you think about it.
Um, anyway, and as you can see this is also going to show how to do elf ears as well, although there are many ways to approach that topic - oh, i'll get to that eventually...lets stay on track here!
All you need for this tutorial is a good ear reference - try looking in the mirror, photos, the guy sitting next to you on the subway with hair growing out of his ears, whatever you like.
You wont need a specific art program since this isn't a program exclusive tutorial. Just in case anyone is curious, i use photoshop CS, plain default brush (opacity at about 20%, size varies, hardness anywhere from 50-100%), and a graphics tablet.
This is by no means the only way to draw an ear. It's just how i like to do it (Smile)")
Ok, on with the show.
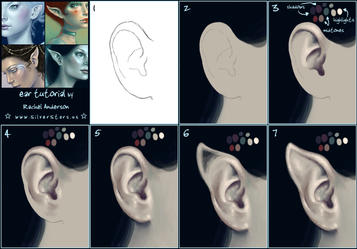
frame 1 - This is my sketch. I usually sketch at a much lighter opacity but for the sake of this tutorial i made it a bit darker. I always sketch on a separate layer so that i can put my colours on new layers below it. Makes things much simpler in the long run.
If you have been looking at enough ear references, you will notice that there is a common shape to all ears. They may differ slightly from each other, but for the most part they all look the same. For the sketch you should try to break down the ear into shapes and lines. You will get rid of the lines eventually, but for now it is good to just deconstruct the ear into the basics. This method works well for all facial features.
frame 2 - Now i reduce the opacity of the sketch so it isn't so dark, and cleaned up the sketchy lines. I also blocked in the hair and skin colours. Pretty simple.
frame 3 - This is where i choose my pallet, and i have arrows pointing to the highlights, midtones, and shadows. It is generally good to use a warm highlight and a cool shadow colour. At least i think that's what the experts suggest, but i am not so good at following directions...and purple isn't the coolest colour out there, but it'll do. I never end up using the red i stuck on there. Just ignore it.
I also started blocking in the lighter and darker areas. Just keep checking your reference. And keep your light source in mind. Mine appears to be coming from the top right.
frame 4 - Now you can see i have added some of the midtone blue. I think it adds depth to the image to have more than three colours on the skin. Don't add too many colours though, or things will start to get muddy and confusing to the viewer.
frame 5 - At this point i merge my sketch layer, though that could be done sooner if you like. Make sure to blend the lines of the sketch into the painting. I finished up by adding some brighter highlights, and darker shadows. That's about it for a regular human ear.
frame 6 - To make an elf ear i just sketch a bit more, making sure to follow the general flow of the human ear up to a rounded point. You can still see where the human ear is under the new sketch.
frame 7 - Then i go in with the same colours and finish it up. I personally like to leave a bit of a ridge around the edge, like human ears have. I think it helps to give elven ears a bit of a realistic look.
various elf ears - (see intro frame) These are just some of the ear shapes i have chosen over the years. I have been using the first one a lot lately. Of course you can do any shape you like, even giving fin like attributes to a mermaid's ear. Fantasy art is all about creativity.
Top - Winter Fairy | Monarch
Bottom - Summer Fairy | Luna Moth
common mistakes:
- Using black and white or burn/dodge to shade and highlight -- Please do not do this. It will make the painting look flat and drab. If your image is in colour, then it's always a good idea to paint with colour! Burn/dodge can probably be used sparingly, but avoid ' ainting' your whole image that way.
- Smudging to get a pointy elf ear -- I see this a lot. It does not look realistic. If you don't care for realism, then smudge away. But if you do want realism, try painting the whole thing with the brush tool, and avoid giving it a point that cartilage (the flexible stuff that shapes our ears) would never form into naturally.
- Not using reference -- It is always good to use reference, even if you are going to vary greatly from the typical anatomy of something. It is always good to have a firm understanding of what something looks like before you go and try to alter it. This is advice that i got years ago, and it has helped me greatly in the areas that i applied it to.
Well, i hope you enjoyed this tutorial. Let me know if you have any questions and i will try to answer them to the best of my ability
Um, anyway, and as you can see this is also going to show how to do elf ears as well, although there are many ways to approach that topic - oh, i'll get to that eventually...lets stay on track here!
All you need for this tutorial is a good ear reference - try looking in the mirror, photos, the guy sitting next to you on the subway with hair growing out of his ears, whatever you like.
You wont need a specific art program since this isn't a program exclusive tutorial. Just in case anyone is curious, i use photoshop CS, plain default brush (opacity at about 20%, size varies, hardness anywhere from 50-100%), and a graphics tablet.
This is by no means the only way to draw an ear. It's just how i like to do it
Ok, on with the show.
frame 1 - This is my sketch. I usually sketch at a much lighter opacity but for the sake of this tutorial i made it a bit darker. I always sketch on a separate layer so that i can put my colours on new layers below it. Makes things much simpler in the long run.
If you have been looking at enough ear references, you will notice that there is a common shape to all ears. They may differ slightly from each other, but for the most part they all look the same. For the sketch you should try to break down the ear into shapes and lines. You will get rid of the lines eventually, but for now it is good to just deconstruct the ear into the basics. This method works well for all facial features.
frame 2 - Now i reduce the opacity of the sketch so it isn't so dark, and cleaned up the sketchy lines. I also blocked in the hair and skin colours. Pretty simple.
frame 3 - This is where i choose my pallet, and i have arrows pointing to the highlights, midtones, and shadows. It is generally good to use a warm highlight and a cool shadow colour. At least i think that's what the experts suggest, but i am not so good at following directions...and purple isn't the coolest colour out there, but it'll do. I never end up using the red i stuck on there. Just ignore it.
I also started blocking in the lighter and darker areas. Just keep checking your reference. And keep your light source in mind. Mine appears to be coming from the top right.
frame 4 - Now you can see i have added some of the midtone blue. I think it adds depth to the image to have more than three colours on the skin. Don't add too many colours though, or things will start to get muddy and confusing to the viewer.
frame 5 - At this point i merge my sketch layer, though that could be done sooner if you like. Make sure to blend the lines of the sketch into the painting. I finished up by adding some brighter highlights, and darker shadows. That's about it for a regular human ear.
frame 6 - To make an elf ear i just sketch a bit more, making sure to follow the general flow of the human ear up to a rounded point. You can still see where the human ear is under the new sketch.
frame 7 - Then i go in with the same colours and finish it up. I personally like to leave a bit of a ridge around the edge, like human ears have. I think it helps to give elven ears a bit of a realistic look.
various elf ears - (see intro frame) These are just some of the ear shapes i have chosen over the years. I have been using the first one a lot lately. Of course you can do any shape you like, even giving fin like attributes to a mermaid's ear. Fantasy art is all about creativity.
Top - Winter Fairy | Monarch
Bottom - Summer Fairy | Luna Moth
common mistakes:
- Using black and white or burn/dodge to shade and highlight -- Please do not do this. It will make the painting look flat and drab. If your image is in colour, then it's always a good idea to paint with colour! Burn/dodge can probably be used sparingly, but avoid '
- Smudging to get a pointy elf ear -- I see this a lot. It does not look realistic. If you don't care for realism, then smudge away. But if you do want realism, try painting the whole thing with the brush tool, and avoid giving it a point that cartilage (the flexible stuff that shapes our ears) would never form into naturally.
- Not using reference -- It is always good to use reference, even if you are going to vary greatly from the typical anatomy of something. It is always good to have a firm understanding of what something looks like before you go and try to alter it. This is advice that i got years ago, and it has helped me greatly in the areas that i applied it to.
Well, i hope you enjoyed this tutorial. Let me know if you have any questions and i will try to answer them to the best of my ability
Image size
900x627px 170.54 KB
© 2006 - 2024 twosilverstars
Comments113
Join the community to add your comment. Already a deviant? Log In
Thank you!